Just wanted to remind you that if you havent already, you should join our Flickr gallery. Even if you don't want to upload your own art, then at least to see art by our other members.
Looking at art, be it in our gallery, art books and other publications, in real life art galleries, etc. can be a huge inspiration to get going with your own art. Just seeing how other people play with colors and shapes can spark a new idea in your mind and will help you get started. I recommend that you take a couple of minutes each day to just observe.
You can join our Flickr Gallery [HERE]
When you get to the page, you will see a link under the Title that says {Join this Group}. Just click that!
Looking forward to seeing you there.
Wednesday, May 30, 2012
Tuesday, May 29, 2012
Challenge - Dream
This challenge can be done digitally or traditionally.
Dream...
Dreaming is a large part of our lives. There are the kinds that fill our minds while we sleep. Sometimes we remember them, sometimes we don't. Then there are the dreams we have about our future. The kind where we meet Prince Charming, win the lottery, travel the world, or possibly get that job we have wanted since we were 5 years old.
In this challenge I would like you to make a page about:
1: what you dreamt last night. The dream that you still remembered when you woke up this morning.
-or-
2: your daydream. The very thing that you dream about the most. Finding Mr. Perfect. What to do with a million dollars. Travel around the world. Your dream, your page.
Here are a few titles, quotes, and poems you might like to use on your page.
Dream: While Sleeping [link to Wikipedia]
Dream: Hope [link to Wikipedia]
Dream: Wish [link to Wikipedia]
Dream - definitions:
1: a series of thoughts, images, or emotions occurring during sleep.
2: an experience of waking life having the characteristics of a dream.
a: a visionary creation of the imagination. Daydream
b: a state of mind marked by abstraction or release from reality.
c: an object seen in a dreamlike state. A vision.
3: something notable for its beauty, excellence, or enjoyable quality.
4a: a strongly desired goal or purpose.
4b: something that fully satisfies a wish.
Titles:
1: Dream Catcher
2: Follow the Yellow Brick Road
3: To Imagine is Everything
4: Imagination Gives You Wings
5: The Building of Dreams
6: Chase a Rainbow, Follow Your Dreams
Quotes:
1: Chasing a seemingly unattainable dream is better than chasing no dream at all.
2: Don't be afraid of the space between your dreams and reality. If you can dream it, you can make it so. (Belva Davis)
3: Dreams come a size too big so you can grow into them.
4: Everyone wants to live on top of the mountain, but all the happiness and growth occurs while you're climbing it.
5: Far away there in the sunshine are my highest aspirations. I may not reach them, but I can look up and see their beauty, believe in them, and try to follow where they lead. (Louisa May Alcott)
6: Having a dream that you don't pursue, is like buying an ice cream cone and watching it melt all over your hand!
~~~~~~~~~~~~~~~~~~~~
Only by Karen Ravn
Only as high as I reach can I grow
Only as far as I seek can I go
Only as deep as I look can I see
Only as much as I dream can I be.
~~~~~~~~~~~~~~~~~~~~
~~~~~~~~~~~~~~~~~~~~
What is a dream?
A dream is a magical thing
A rainbow of joy in your heart
Your own secret corner
Where no one can go
Where the path
To fulfillment can start
A dream lures you on,
Always one step ahead
Until you have caught it,
And then there's always another
To capture your soul
And lead you onward again.
~~~~~~~~~~~~~~~~~~~~
~~~~~~~~~~~~~~~~~~~~
A Dream is a Wish Your Heart Makes by Donna McElroy
A dream is a wish your heart makes
When you're fast asleep.
In dreams, you will lose your heartache
Whatever you wish for, you keep.
Have faith in your dreams and someday
Your rainbow will come smilin' through.
No matter how your heart is grieving
If you'll keep on believing
The dream that you wish for will come true.
~~~~~~~~~~~~~~~~~~~~
I hope you have fun doing this challenge.
REMEMBER: Art Journaling is not about the beginning or the end. It is all about the process. The Journey!
And if you feel up to it, please share pictures of your art journal pages at our Flickr gallery HERE
Monday, May 28, 2012
Trash to treasure...
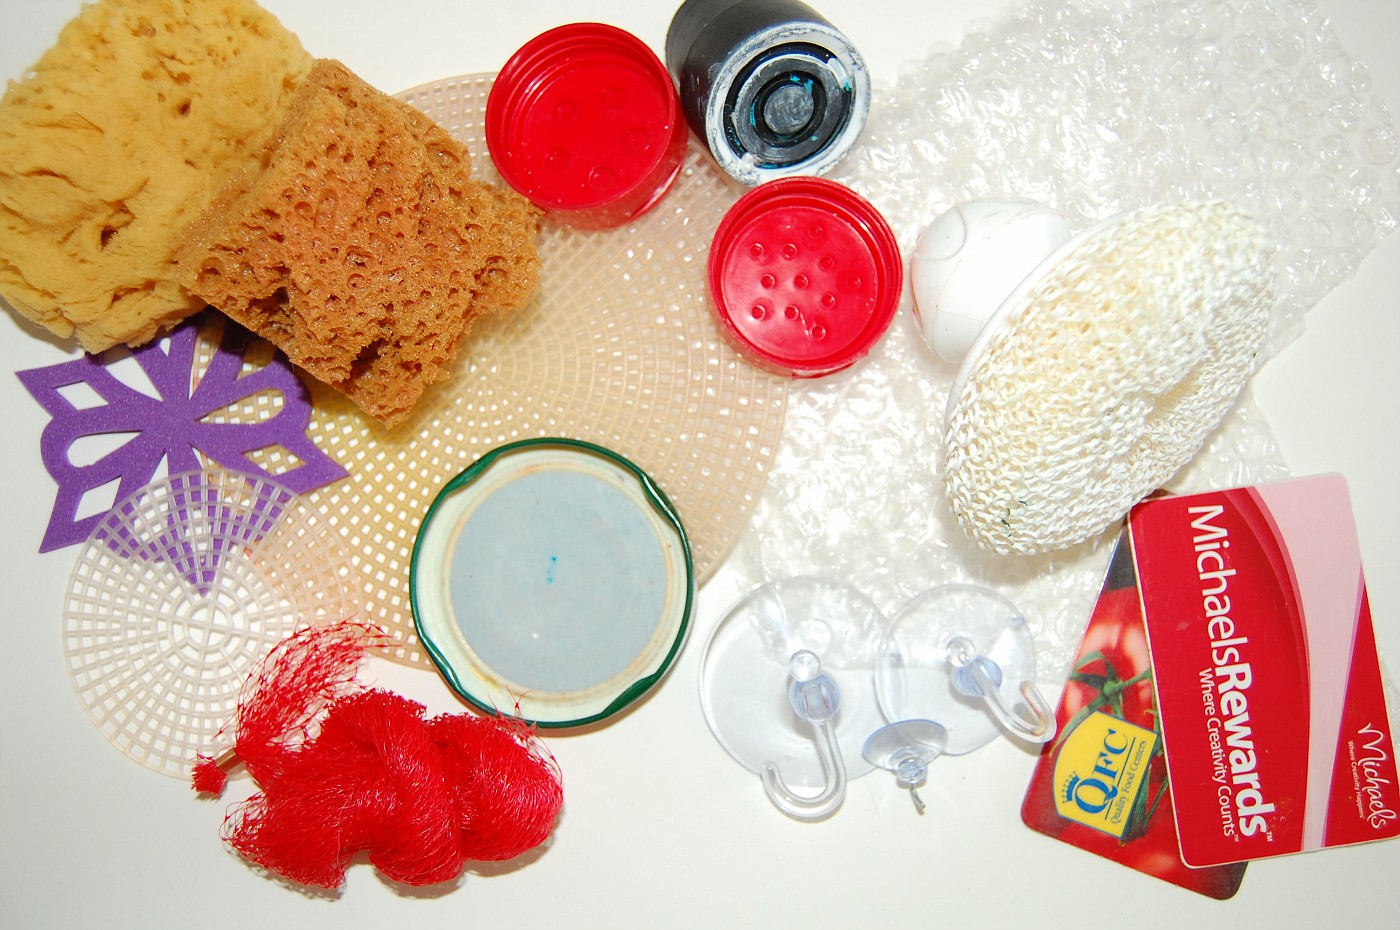
You already have a lot of "art supplies" around the house, it is just a question of seeing past what the items where intended for and seeing the possibilities of what they can become in your art studio. In the photo above you will see several items that normal people would have put in the trash bin. But we are not normal, we are art journalers.
In the photo you see a couple of old spice container lids, a jar lid, bubble wrap, sponges, a fruit bag, a foam snowflake, some plastic canvas, a dish scrubber, and more. Right now you are probably thinking "how on earth am I going to use this in my journal". Well, the lids make some awesome circles when dipped in paint and then "stamped" onto your page. Take a paint brush and apply paint to the bubble wrap and then "stamp" it to your page, it makes some great textures. The plastic canvas is fantastic when you use homemade spray paint. The sponges and the fruit bag also make cool textures.
Use your imagination! Take a walk through your house to see what you can find. Items that might otherwise end up in the trash. Look in your junk drawer, under the kitchen sink, the garden shed. And your kids room is probably full of wonderful items. And I am sure they wont mind you 'borrowing' a couple of legos.
Other items that might be interesting: fabric with a lot of texture, foam earplugs, pipe cleaners, rubber bands, doilies, etc.
REMEMBER: Trashures ARE Art Journaling for Less!
Please share in the comments what items you have found in your house.
Challenge - 02
In this challenge I thought we would build on to the background we made in challenge one. If you have not done challenge one, you can use any background you may have on hand or just go with a blank page.
1: Find the page you want to work on. From challenge 01, or something else. (I am using the watercolor page from challenge 01)
2: Pull out some Collage Fodder. I use various items, but in this one I chose to go with just vintage book pages. I used pages from about 7 different books. Old books come in various sizes and textures, so I really enjoy mxing it up to give my collage a lot of interesting textures.
You can get some awesome Collage Fodder HERE
This is what I used:
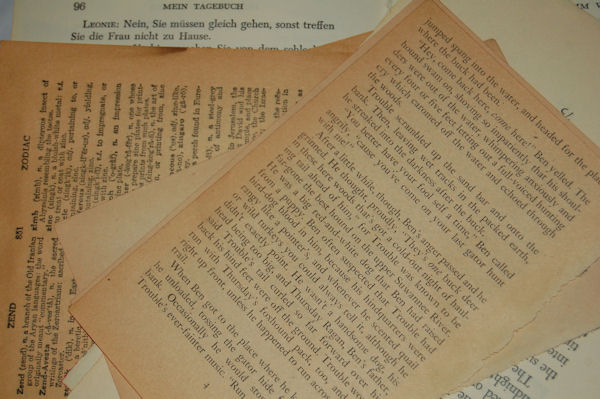
3: Tear your fodder into pieces.
4: Other supplies:
a - Glue - I used Mod Podge. It is cheap and I find that it works just as well as the more expensive collage / decoupage glues.
b - Plastic card. You can use old credit cards, gift cards, hotel key cards. We use then to smooth out bubbles when you glue your collage fodder to the pages. Apply glue, place your fodder, add a little more glue to edges and areas that doesnt stick well. Then take your plastic card and scrape across the surface. This way you will eliminate bubbles, and you will get rid of excess glue.
c - Paint brush. You will need this to apply the glue. I use an old worn out watercolor brush. I do suggest you use an old brush, because the glue is hard to really wash out completely.
d - Wet Wipes. You need this to wipe your plastic card on so you do not get a build up of glue on the card. I buy super cheap wet wipes at the dollar stores. The kind with alcohol in them. Because they are rather cheap they tend to be kinda dry when buy them, or they dry out fast. So I usually add a couple of spoonfuls of plain rubbing alcohol to the container. Shake well. If they dry out along the way, just add more alcohol.
5: Mindless collage. Do not plan ahead. Just start applying glue to your pieces and place them at random to your page. I almost covered my page completely. but you can do as much or as little as you like. It is just to add texture.
TIP 1: If you use Mod Podge, you will want to work fairly quickly. Also try not to add water to your brush, as Mod Podge is already waterbased. More water will make your page buckle more. When using Mod Podge it is hard to avoid buckling. I usually let my page dry completely then close the book and place something heavy on top. This will "press" the page amd remove most of the buckling.
Have fun!
And if you feel up to it, please share pictures of your "background" art at our Flickr gallery HERE
SAMPLE:
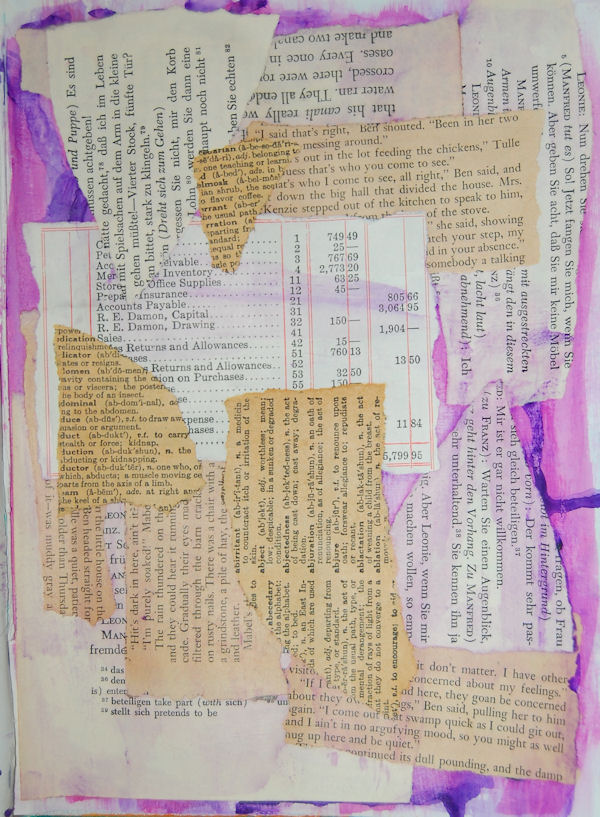 I used the watercolor background from challenge 01. I used fodder from about 7 different book. Pieces are torn to various sizes and shapes.
Amount of time spent making the collage: 10 minutes.
Prep and Clean-up: 5 minutes.
Total amount of time spent: 15 minutes.
REMEMBER: Art Journaling is not about the beginning or the end. It is all about the process.
1: Find the page you want to work on. From challenge 01, or something else. (I am using the watercolor page from challenge 01)
2: Pull out some Collage Fodder. I use various items, but in this one I chose to go with just vintage book pages. I used pages from about 7 different books. Old books come in various sizes and textures, so I really enjoy mxing it up to give my collage a lot of interesting textures.
You can get some awesome Collage Fodder HERE
This is what I used:
3: Tear your fodder into pieces.
4: Other supplies:
a - Glue - I used Mod Podge. It is cheap and I find that it works just as well as the more expensive collage / decoupage glues.
b - Plastic card. You can use old credit cards, gift cards, hotel key cards. We use then to smooth out bubbles when you glue your collage fodder to the pages. Apply glue, place your fodder, add a little more glue to edges and areas that doesnt stick well. Then take your plastic card and scrape across the surface. This way you will eliminate bubbles, and you will get rid of excess glue.
c - Paint brush. You will need this to apply the glue. I use an old worn out watercolor brush. I do suggest you use an old brush, because the glue is hard to really wash out completely.
d - Wet Wipes. You need this to wipe your plastic card on so you do not get a build up of glue on the card. I buy super cheap wet wipes at the dollar stores. The kind with alcohol in them. Because they are rather cheap they tend to be kinda dry when buy them, or they dry out fast. So I usually add a couple of spoonfuls of plain rubbing alcohol to the container. Shake well. If they dry out along the way, just add more alcohol.
5: Mindless collage. Do not plan ahead. Just start applying glue to your pieces and place them at random to your page. I almost covered my page completely. but you can do as much or as little as you like. It is just to add texture.
TIP 1: If you use Mod Podge, you will want to work fairly quickly. Also try not to add water to your brush, as Mod Podge is already waterbased. More water will make your page buckle more. When using Mod Podge it is hard to avoid buckling. I usually let my page dry completely then close the book and place something heavy on top. This will "press" the page amd remove most of the buckling.
Have fun!
And if you feel up to it, please share pictures of your "background" art at our Flickr gallery HERE
SAMPLE:
Amount of time spent making the collage: 10 minutes.
Prep and Clean-up: 5 minutes.
Total amount of time spent: 15 minutes.
REMEMBER: Art Journaling is not about the beginning or the end. It is all about the process.
Saturday, May 26, 2012
Glitter is a must...
I love to add glitter to my pages. It just adds that final touch to any page. And you can add a little or you can add a lot. There are a lot of different products that you can buy to add your sparkle. You can of course buy the little vials with glitter. Add glue to your page and then sprinkle your glitter onto your glue, or add the glitter to wet paint. However, that can become such a mess. Glitter everywhere for years to come. This is probably a reason why some people stay away from glitter.
I personally use two different types of glitter.
1: FolkArt Extreme Glitter from Plaid.
These are sold most anywhere in the US. Walmart carry most of the colors. And they are priced around $2 for 2 oz.
You can apply them just as you would any acrylic paint. Use a small brush, use your fingers, or apply any other way you prefer. The "paint" goes on as a milky white paint, but will dry clear so only the glitter shows.
You can get these at HofCraft for less than $2
2: Glitter Glue.
You can get these from various manufacturers. Crayola, Elmer's, and Cra-Z-Art, are just a few that I have used. Martha Stewart also sell glitter glue.
Prices on glitter glue varies a great deal. Here is a small list that I have compiled.
Martha Stewart: 4ct for $9.99 at Scrapbook.com The packs come in various sizes, colors, and prices.
Crayola: 5ct for $5.06 at Walmart.com Come in different colors as well.
Elmer's: 10ct for $4.88 at Walmart.com
Cra-Z-Art: 10ct for $2 at Family Dollar
I really suggest you check your local dollar store, dime store, or other discount store you might have. And get the cheapest you can find, and try it out.
Several of these glitter glue pens say they will dry raised or as 3D, but if you dont care for that, you can "smear" the glue with a finger to make it more flat when you apply it.
Collage Fodder

You get ALL this for just $12 INCLUDING shipping anywhere in the world.
You can get your pack here: Collage Fodder at Twisted Scrapper Boutique
Friday, May 25, 2012
Challenge - 01
You want to make beautiful art. You want to make collages, art journals, and draw pretty pictures. You just dont know where to start.
I suggest you start with the background. Don't even worry about what your art will look like when you are done.
1: Find yourself a piece of paper (loose leaf or in your journal). Don't worry about type, weight, color.
2: Look in your art/craft supplies for something that can add color. It can be anything. Water color, acrylics, markers, crayons, ink. Anything.
3: Choose a couple of colors.
4: Apply to paper. I suggest that if you are using paints, just use your fingers to apply the paint. It doesnt have to be pretty. It just have to be. Of course getting your fingers dirty can be intimidating, and if it is still too much for you, then by all means use a brush, rag, sponge, or whatever you want. There are no rules!
5: Let dry!
This exercise is all about adding color. And has nothing to do with how your end result will look. You may choose to later on add more color, some collage, or completely cover it up. Just add color now!
TIP 1: When working with colors, especially wet medium such as paints, there is always the risk that you will get 'mud'.
You can blend your colors while they are still wet, however you should always keep in mind that when blending wet medium there is always a moment when you go from "oh that's pretty" to "oh wow, that's mud". You will need to know when to stop swirling the colors together. There is no manual that will tell you that after so much time, you must stop, it is up to you to decide. But don't worry, you are not going to destroy your journal. If you get 'mud', just let it dry, and paint over it.
TIP 2: Gesso. I love gesso, and it really comes in handy when your beautiful art has turned to 'mud'.
Gesso is a mixture used for surface preparation and is very good to have on hand when working in your art journal. You can use it both directly on your paper to prep the paper before you start painting, you can use it to 'rescue' your page if your art has turned to 'mud', or you can use in combination with your other wet or dry medium.
TIP 3: If you don't have much time to hang around and watch paint dry, use an old hair dryer. However, if you used acrylic paints, oil pastels, etc. be sure not to apply too much heat. If your hair dryer have the options, use cool air, or low heat. Hold the hair dryer at least 8 inches from your art, and use a swift side to side motion to move the air over your art.
You can purchase heat guns at art supply stores that are invented just for this purpose, but if you have an old hair dryer that will work just as good.
Enjoy!
And if you feel up to it, please share pictures of your "background" art at our Flickr gallery HERE
SAMPLES:
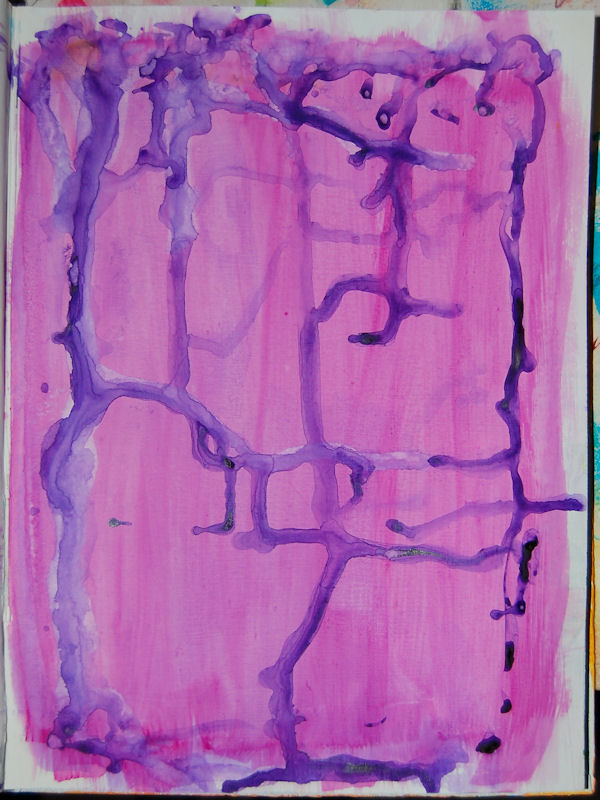 This one I did in a "Childrens Dictionary turned Art Journal", so it is done on regular book paper prepped with gesso. I used watercolors. First I added a layer of pink water color that I smoothed with a wet wipe. Just apply the color with a large paint brush, then take a wet wipe (w/ alcohol) and wipe over to smooth the colors. It was such a thin layer of paint that it didn't need any drying time. Then I took a very wet paint brush and added some large drops/smears of dark purple watercolor. Lifted up the book and tilted from side to side to make the paint run. I removed some of the paint that had run to the edge with a paper towel, then used the hair dryer to dry it just a little bit. Then I added some more purple and tilted the book again to make it run in more directions. When I felt it had made enough "runs" I dried it with the hair dryer again. This time till it was almost completely dry.
Amount of time spent painting: 5 minutes.
Prep and Clean-up: 5 minutes.
Total amount of time spent: 10 minutes.
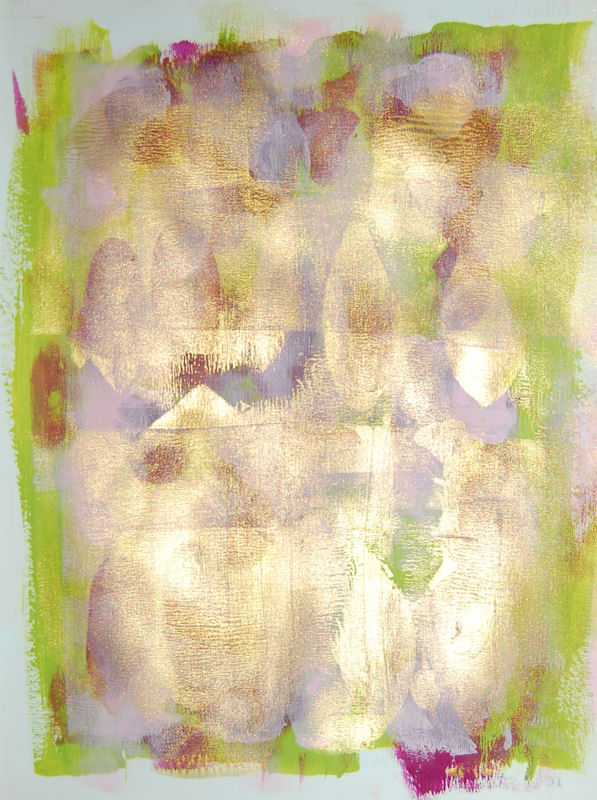 This is done in the same book as the one above. This time I used acrylic paint.
First I used a large brush to paint a layer of Citrus Green acrylic paint from FolkArt Plaid. I let it dry some while I figured out what I wanted to do next. Next I added a few drops of Grape colored acrylic paint from Delta Ceramcoat. Just drops here and there. Not too many. Then I used a Speedball Soft Rubber Brayer to "roll out" the drops. Didn't want it to cover completely. Just enough to make so smears. Did the same with a Baby Pink from FolkArt Plaid, and Metallic Inca Gold from FolkArt Plaid. The gold layer I did smear a little more than the other layers. I let the paint dry a little between layers. Just long enough while I cleaned the color of the brayer.
Amount of time spent painting: 5 minutes.
Prep and Clean-up: 5 minutes.
Total amount of time spent: 10 minutes.
NOTE: These pages might not look like much, but remember that when I make these pages into art journal pages, these painted backgrounds might not even show. I might cover the majority of this page with collage, I might add more paint or other color, or I might change my mind completely and cover with gesso. Art Journaling is not about the beginning or the end. It is all about the process. I really enjoyed painting these pages and it was very relaxing for me. And really the enjoyment you get from doing is all that counts.
I suggest you start with the background. Don't even worry about what your art will look like when you are done.
1: Find yourself a piece of paper (loose leaf or in your journal). Don't worry about type, weight, color.
2: Look in your art/craft supplies for something that can add color. It can be anything. Water color, acrylics, markers, crayons, ink. Anything.
3: Choose a couple of colors.
4: Apply to paper. I suggest that if you are using paints, just use your fingers to apply the paint. It doesnt have to be pretty. It just have to be. Of course getting your fingers dirty can be intimidating, and if it is still too much for you, then by all means use a brush, rag, sponge, or whatever you want. There are no rules!
5: Let dry!
This exercise is all about adding color. And has nothing to do with how your end result will look. You may choose to later on add more color, some collage, or completely cover it up. Just add color now!
TIP 1: When working with colors, especially wet medium such as paints, there is always the risk that you will get 'mud'.
You can blend your colors while they are still wet, however you should always keep in mind that when blending wet medium there is always a moment when you go from "oh that's pretty" to "oh wow, that's mud". You will need to know when to stop swirling the colors together. There is no manual that will tell you that after so much time, you must stop, it is up to you to decide. But don't worry, you are not going to destroy your journal. If you get 'mud', just let it dry, and paint over it.
TIP 2: Gesso. I love gesso, and it really comes in handy when your beautiful art has turned to 'mud'.
Gesso is a mixture used for surface preparation and is very good to have on hand when working in your art journal. You can use it both directly on your paper to prep the paper before you start painting, you can use it to 'rescue' your page if your art has turned to 'mud', or you can use in combination with your other wet or dry medium.
TIP 3: If you don't have much time to hang around and watch paint dry, use an old hair dryer. However, if you used acrylic paints, oil pastels, etc. be sure not to apply too much heat. If your hair dryer have the options, use cool air, or low heat. Hold the hair dryer at least 8 inches from your art, and use a swift side to side motion to move the air over your art.
You can purchase heat guns at art supply stores that are invented just for this purpose, but if you have an old hair dryer that will work just as good.
Enjoy!
And if you feel up to it, please share pictures of your "background" art at our Flickr gallery HERE
SAMPLES:
Amount of time spent painting: 5 minutes.
Prep and Clean-up: 5 minutes.
Total amount of time spent: 10 minutes.
First I used a large brush to paint a layer of Citrus Green acrylic paint from FolkArt Plaid. I let it dry some while I figured out what I wanted to do next. Next I added a few drops of Grape colored acrylic paint from Delta Ceramcoat. Just drops here and there. Not too many. Then I used a Speedball Soft Rubber Brayer to "roll out" the drops. Didn't want it to cover completely. Just enough to make so smears. Did the same with a Baby Pink from FolkArt Plaid, and Metallic Inca Gold from FolkArt Plaid. The gold layer I did smear a little more than the other layers. I let the paint dry a little between layers. Just long enough while I cleaned the color of the brayer.
Amount of time spent painting: 5 minutes.
Prep and Clean-up: 5 minutes.
Total amount of time spent: 10 minutes.
NOTE: These pages might not look like much, but remember that when I make these pages into art journal pages, these painted backgrounds might not even show. I might cover the majority of this page with collage, I might add more paint or other color, or I might change my mind completely and cover with gesso. Art Journaling is not about the beginning or the end. It is all about the process. I really enjoyed painting these pages and it was very relaxing for me. And really the enjoyment you get from doing is all that counts.
Thursday, May 17, 2012
A Beginner Art Journaling Kit
If you have been art journaling for a while you will probably already have build up a nice stash of items that you always use. Your "go to" stash. And if you are just a little bit like me your actual stash of supplies is much larger than what you really need. In this post I will try to narrow the list down to a reasonable size for someone who is just beginning. Call it your beginner art supply stash if you like.
This will in no way be a complete list and the items listed will not be required to have to be able to art journal. It is just those few items that I can not live without.
1: Journals
Most importantly you will need a journal. There are no specific journals that are required. You can use pretty much anything you like.
I have several different journals. Mostly because I like to work on various sizes depending on what I am wanting to make. I prefer a medium size. At least 7x8 inches. Sometimes I go larger and other times I go smaller. Largest one I am working in at the moment is 8x10.5 inches and the smallest is 5x7 inches. Choose a size that you feel comfortable with.
You can of course also use loose leaf papers. Then either just keep them in a binder or get the bound into a book when you are done.
I also prefer paper that is heavy enough that it can stand up to being covered in paint, glue, or sprayed with water. I prefer 140lbs hot press water color paper. It is smooth yet heavy. I believe the lightest paper I use is 90lbs mixed media paper.
For a beginner I suggest: A Strathmore Visual Journal, mixed media paper, and 9x12 inches. It is not the cheapest journals at around $10-15, but it is certainly not expesive either.Some Walmarts have begun carrying the Daler-Rowney mixed media journals and they cost about $10.
2: Colors
You will need to get some colors to add to your journals. I personally do not have a preference. One day I enjoy water colors and another acrylics, and sometimes I mix them all.
Water Colors: I bought a box of 24x12ml tubes of water colors by ArtCreation Expression at Hobby Lobby for about $17 I prefer tubes rather than pans (more about this later). I do have a small pan set with 12 colors.
Acrylics: Same as with the watercolors. I bought a pack of 24x12ml ArtCreation Expression at Hobby Lobby for about $17. Those are perfectly fine for a beginner until you decide if this a medium you want to explore further.
Coloring Pencils: As a beginner all you really need is a small pack of 12-24 pencils. You can read more about my coloring pencil preferences HERE.
Markers: I prefer Sharpie permanent markers. They are cheap and they work fine for my use.
Water color pencils and crayons: I use Loew-Cornell watercolor pencils and Derwent Inktense pencils. They are entirely different in price and quality. The Loew-Cornell are perfectly fine for art journaling, but if you want to splurge I suggest Derwent Inktense pencils. I bought a box of 12 for $36. Probably will never buy them again unless I find them really cheap AND 50%.
For watercolor crayons I use Staedtler Karat Aquarell and Caran d'Ache Neocolor II Artists' Crayons. The Staedtler crayons are perfectly fine for art journaling and are quite a bit cheaper than the Neocolors. Neocolors are wonderful crayons, but also expensive. I have seen packs of 15 at $34, but you can find them cheaper on Amazon. Something to consider when you want to splurge or maybe add to your Christmas or birthday wish lists.
3: Writing Tools
For writing you can use pretty much anything you are comfortable with. I like to use several different items depending on what I am writing.
This is a small list of what I use:
Sharpie permanent markers (many different colors)
Sharpie poster-paint markers (white, black, gold, and silver) Make sure they are water based.
Sakura Glaze (many colors, but most often I use black and white)
Sakura Pigma Brush (black)
Gel pens (black and white)
Glitter Gel pens (many colors)
4: Collage Fodder
I cut pictures from magazines, and because I art for me I dont worry about copyright. I most times wont share my art journal pages and I definitely will not profit from them, so I use magazine clippings.
I pretty much use any kind of paper I can get my hands on, but I will get into this further in a different article.
5: Adhesive
I use Modge Podge. Some people swear by it and others think it is the worst. I like it. For glue stick I use UHU stics. And sometimes I will use a tape runner from Tombow and also the Tombow liquid glue.
There are so many other items that you can use when art journaling such as tape, ribbon, stamps, spray ink, and much much more. I will get more into that later, but to begin with this is really all you need:
A journal (or loose leaf papers)
Colors (your preference)
Writing tools
Collage fodder
Adhesive
Have fun!
Coloring Pencils
There are SO many different brands out there that it would be impossible for me to try them all out, but I have tried a couple. I believe what people like are the pencils that are softer, because they give more pigment when you use them. So it is entirely a preference thing. And what you choose is entirely up to you.
The one that the "real artists" will tell you to buy is Prismacolor. They are actually pretty good, but they also cost anywhere from $.89 to $1.29 per pencil. That can become quite expensive if you use more than a few colors.
You can also get one that is slightly cheaper called Scholar Prismacolor. They are a bit less expensive. About $8 for 12 at Walmart. (I actually paid only $.10 for a pack of 12 due to a mark down error). Honestly I can not tell the difference between the two types. I tried using the color "Bleu Copenhagen" from both sets and even though there was a slight different in the actual color, the intensity was so close that I personally couldn’t tell the difference.
I use Crayola a lot and you can get a pack of 12 for about $3, depending on where you buy them. Sure they are not as 'soft' or color intense as Prismacolors, but for my purpose they work just fine.
Walmart also carries a line of products from Daler-Rowney called Simply Artist. A pack of 12 pencils will run about $7. Only issue with these are when they need sharpening. I have tossed a couple because they constantly break when you try to sharpen them.
I think when it comes to coloring pencils it is really all about how much you are willing to pay. And how much you use them. I use them a lot so I definitely prefer to pay as little as possible. I really don’t use them to make large pieces of art, I am using them more to add a few lines of color, some detail, etc. If coloring pencils are your preferred art supply and you plan on focusing on art made using coloring pencils then you will probably want to pay for the better quality rather than quantity.

Subscribe to:
Posts (Atom)